How to Handle Volume When Producing Music
Loudness
To master digital audio, it is important to comprehend loudness—the measurement of a sound’s intensity. Professionally produced audio recordings feature significant loudness levels, especially compared with amateur productions, which often suffer from deficient or excessive loudness.
Loudness is measured using decibels (dB), and decibels express the ratio between two power levels. Decibels are typically used to meter sound pressure or electric energy.
A ratio is a mathematical relationship that shows how many times one quantity can encapsulate another. It can be described with words like degree, proportion, or rate. For example, if you have one candy bar but I have two, then your ratio (degree, proportion, rate, etc.) of candy bars to mine is 1:2 (one to two). Ratios are sometimes expressed as fractions, as in 1/2 for the above example. When you encounter a ratio, or a fraction, you can quantify the degree, proportion, or rate by dividing the first number by the second:
1 ÷ 2 = 0.5
The number 0.5 can be thought of as 50 percent. Therefore, you have 50 percent as much candy as I do. I can consume twice as many candy bars as you can consume.
One of the common decibel systems that we’ll explore in this blog post operates by expressing a ratio between the voltage of any given audio signal to a standardized voltage of 0.775. For example, the voltage created by an open D string on an electric guitar is about 0.425, so the ratio is expressed thusly:
0.425 ÷ 0.775 = 0.548
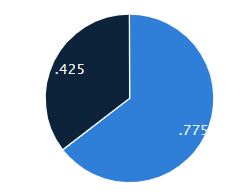
The way the system works, 0.775 is assigned the number 0, and any voltage below that intensity is given a negative number and any voltage above that intensity are given a positive number. So, the open-D string on a guitar registers as a negative number. I’ll explain more about these kinds of decibels below, but for now let’s consider the origin of the word decibel.
The word decibel is formed by combining the prefix deci-, which is an abbreviation for ten, and the eponymous word Bell, which is a unit for the amount of signal lost over a mile of telephone wire. The word Bell is named for the nineteenth-century inventor and scientist called Alexander Graham Bell—the inventor of the telephone. This amount of signal loss—the bel—is too large for pro-audio applications, so the unit is divided into tens—hence, the name decibel.
This amount of signal loss—the bel—is too large for pro-audio applications, so the unit is divided into tens—hence, the name decibel.
Four Kinds of Decibels
There are many distinct types of decibels, but there are four that are especially useful to music technologists:
- Decibels that measure acoustic sound pressure (dB–SPL)
- Decibels that measure voltage (dBu)
- Decibels that measure digital audio (dBFS)
- Decibels that measure the perceived loudness of pro audio (LUFS)
Following is a description of these four decibel systems:
Acoustic Sound Pressure (dB–SPL)
The acoustic intensity of sound is specified by how many times greater that sound is than a reference level of 10⁻¹² watts per square meter, which is the threshold of human hearing.
10⁻¹² is equal to a decimal point followed by eleven zeros and then a 1. It looks like this when written out: 0.000000000001 W/m². And, it represents 0 dB SPL.
Remember, decibels are the ratio between two physical properties. When calculating dB-SPL, the two physical properties are as follows:
- The reference number of 10⁻¹² watts per square meter
- Some other sound’s watts-per-square-meter intensity
For example, if you divide the reference number 10⁻¹² by 10⁻11, then the quotient is 0.1, which is equal to 10 dB–SPL. So, 10⁻11 W/m2, also known as 0.00000000001 W/m², is equal to 10 dB–SPL.
Here are some more decibels:
| 30 dB–SPL | = | 0.000000001 W/m² | 10-9 W/m2 |
| 40 dB–SPL | = | 0.00000001 W/m² | 10-8 W/m2 |
| 50 dB–SPL | = | 0.0000001 W/m² | 10-7 W/m2 |
| 60 dB–SPL | = | 0.000001 W/m² | 10-6 W/m2 |
| 70 dB–SPL | = | 0.00001 W/m² | 10-5 W/m2 |
| 80 dB–SPL | = | 0.0001 W/m² | 10-4 W/m2 |
| 90 dB–SPL | = | 0.001 W/m² | 10-3 W/m2 |
| 100 dB–SPL | = | 0.01 W/m² | 10-2 W/m2 |
| 110 dB–SPL | = | 0.1 W/m² | 10-1 W/m2 |
These kinds of decibels, dB–SPL, are not the ones used for pro audio applications because there is no way to get an accurate reading on sound pressure levels in a pro audio context. There is too much variation in equipment and listening environments: speakers, cables, amplifiers, and room sizes all vary widely from studio to studio.
Consequently, a different type of decibel is used to measure loudness in a pro-audio context: the decibel volt (dBu).
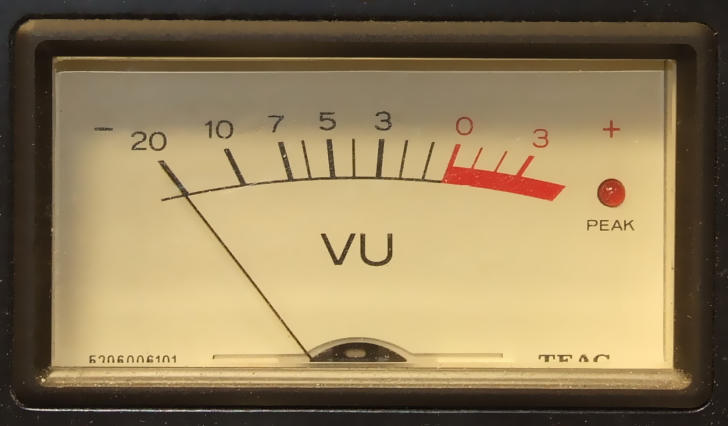
Decibel Volts (dBu)
dBu, which I briefly outlined above, is a relative unit that measures the input and output signals of sound equipment against a standard voltage. In most cases, the standard voltage is 0.775. This amount of voltage corresponds to a reading of 0 dBu. Sound that is quieter than this value has a negative number, and sound that is louder than this value has a positive number.
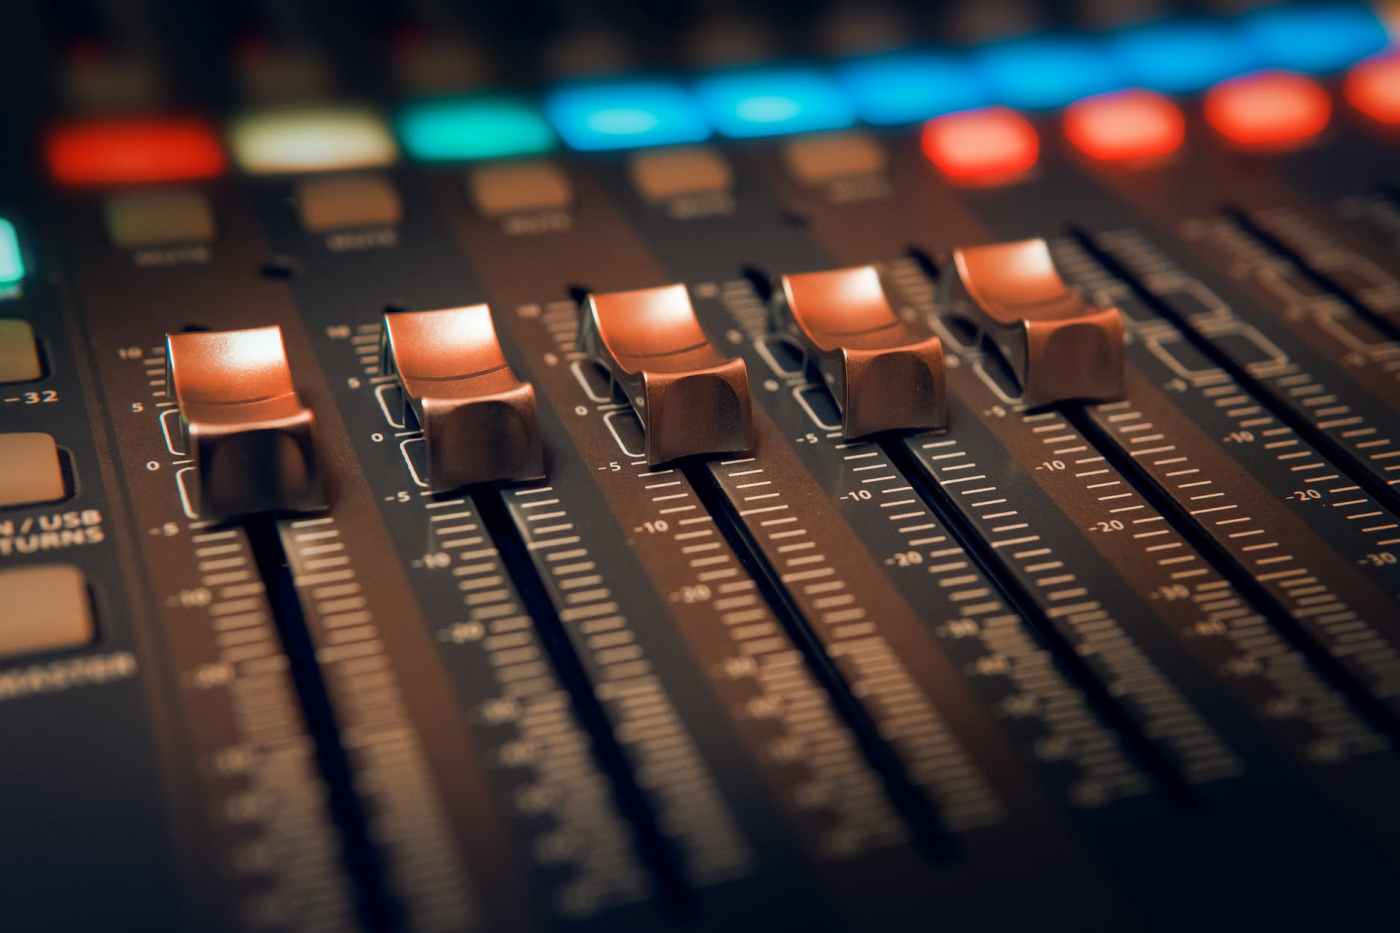
The dBu unit evolved in the era of analog gear and was displayed on devices called VU meters. Old-school mixing consoles were adorned by many VU meters.
Decibels Relative to Full Scale (dBFS)
Using analog gear, engineers can push past 0 dBu without clipping. But digital audio has an absolute upper limit. Consequently, a different unit for measuring digital audio became necessary with the advent of digital audio. That unit, which evolved in the late 1970s, is called dBFS, which stands for “decibels relative to full scale.” The threshold of clipping in the dBFS system is 0 dBFS. No sound can go beyond zero without becoming distorted.
There are two ways that dBFS is measured: (1) peak meters and (2) RMS meters.
Peak meters display the highest amplitude level produced by an audio signal and are good for displaying when a sound has eclipsed the 0 dBFS threshold. RMS meters calculate the average, over-all loudness of a signal and are good for displaying the perceived intensity of the sound.
RMS meters display the signal as being softer than that indicated by peak meters. This is because the transients are averaged with the sustained sounds. For example, the combination of a snare drum and a sustained organ note will appear lower than the snare drum but higher than the organ if measured by RMS.
Many loudness meters combine the two systems in one display. For example, the master-channel strip in Studio One is equipped with a peak/RMS (PkRMS) meter:

Loudness Unit Full Scale (LUFS)
The newest loudness unit is LUFS, which stands for “loudness unit full scale.” This unit was developed by the International Telecommunications Union to provide a consistent method of measuring the loudness of television broadcasts. A law passed in the U.S. against loud commercials was the impetus for the development of this unit.
Metering with LUFS is like metering with RMS—that is, both provide a measure of average sound intensity. However, LUFS provide a reading closer to the human perception of loudness, whereas RMS provides a direct reading of signal power.
Roughly, 1 loudness unit (LU) is equal to one decibel (dB).
A good LUFS reading for a mastered song is about -11 to -13 LUFS. YouTube normalizes its audio to around -14 LUFS. The broadcast law for television stipulates a -23 LUFS reading.
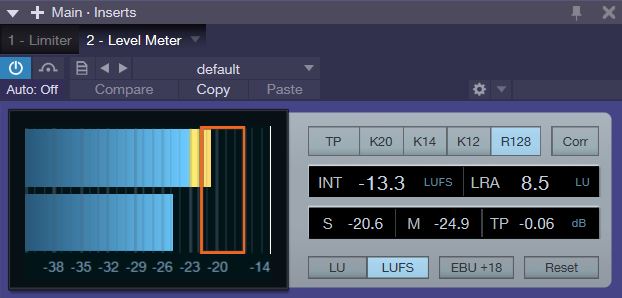
In my experience, LUFS and RMS track close to one another. So, if you’ve got a reading of -15 RMS, then your LUFS will likely be close to the same number.
Balance
Your goal should be to perfectly balance the volume in your mix so that all sounds are clear and intelligible. To achieve this, begin by setting your master fader to about -12 dB. (There is a highlighted tick mark at this point.)
Next, ensure that none of your meters have peaked. A peaked meter is indicated by a red light that appears at the top of the volume fader. Click these peaks off, then decrease the volume on each track of your Song.
Keep in mind, the master fader is handling the sum of all tracks, so each individual track must be issuing a modest amplitude. Otherwise, the combination of sounds will cause the master fader to peak. Be sure to listen to your music all the way through to ensure that no clipping is present.
After you’ve ensued that none of you tracks have peaked, the final step is to apply a volume maximizer to the master fader. This will ensure that your track sounds as loud as commercially produced audio.
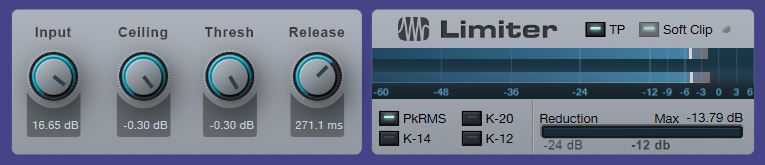
A good starting point is to set the ceiling somewhere between 0 dB and -1 dB. Studio One for Engineers and Producers by William Edstrom Jr. suggests starting at -0.3 dB (124).
Once the ceiling is set, most limiters work by allowing you to boost the input level—thus, increasing the mix’s sound up to the level of the ceiling. The net result is dramatically increased amplitude.
Input level determines the volume of sound fed into the limiter. Turn this knob up until you begin to see the limiter’s reduction meter activating. Use your ears and try to achieve a smooth, bright timbre. Too much limiting will distort your track.
Strive to find a happy medium.

Leave a comment