
Introduction
On the first day of my music-technology class, I often ask students what the difference is between mixing and mastering. I’ll usually say something like “what’s the difference between an album that’s been remastered and one that’s been remixed?” Typically, I am greeted with an ocean of silence. Hardly anyone, it seems, grasps the distinction. Or, if they do, they are incapable of articulating it. The purpose of what follows is to first clarify this distinction and then outline a strategy for performing one of them—mixing. Let’s begin by defining each.
Mixing is the art and craft of balancing volume, positioning sounds, and applying effects to separate audio tracks to create a single, compound track called a master. Mastering is the art and craft of applying effects and volume adjustments to the master track. The master track, which is the summation of all sounds within a project, is a two-track recording, consisting of a left and a right channel. Master tracks are what get streamed on Spotify, sold on compact disc, or otherwise distributed for consumer consumption. A mix, on the other hand, has many tracks, usually somewhere between eight and twenty-four, and exists only within the producer’s laptop. You cannot buy a mix, only a master.[1]
For a pop song, common components of a mix include kick drum, snare drum, drum overheads, bass guitar, rhythm guitar, lead guitar, keyboards, horns, strings, lead vocals, harmony vocals, auxiliary percussion, and synthesizers. Many other track-types are possible, but these are the typical ones. When you are mixing, you have independent control over each of these sounds; when you are mastering, you no longer have independent control over these sounds—they’ve been summed into one, two-track recording. When you’re still in the mixing stage you can apply effects, volume adjustments, and other manipulations to the individual tracks. You can turn up the bass and not the drums, say. You cannot perform any such adjustment while mastering. Now, you will get overzealous mastering engineers that insist they can do similar adjustments with EQ, but they are massively overstating what is possible. Can they turn the drums off and leave the bass on full volume? No, they cannot. Such a maneuver is only possible through mixing. While you are mixing, you have real control over the form and content of your song. It’s important to do it right and to be familiar with the details.
What follows is a summary of these details. It covers the adjustable components of a mix, the main problems you’ll encounter while mixing, the chief goals of mixing, and a general procedure for mixing a song.
Let’s begin by examining the adjustable components of a mix.
Adjustable Components
To create a mix, you must adjust the following components for each one of your tracks:
- Volume
- Pan
- Dynamics
- Equalization
- Effects
This means that you’ll have to adjust the volume, pan, dynamics, EQ, and effects for your kick drum, your snare drum, your guitars, your keyboards, your vocals, and so on. So, for each sound in your mix, you’ve got five things to consider and adjust. In case you’re uncertain about what these components are, here are their definitions: Volume refers to amplitude or loudness, panning refers to spatial positioning between the speakers, dynamics refers to amplitudinal differences within a single track, equalization refers to the volume of specific frequencies, and effects refer to signal processors like delays and reverbs.
Balancing volume is the most straight-forward adjustable component. Obviously, you need to adjust the volume of each track so that it coincides, and works well, with every other sound in the mix.
Configuring the pan of your mix is also straight-forward because musical performances are usually delivered from a stage with some members of the band on the left, some on the right, and some in the center. Your task with the pan knob is to recreate this reality.
Adjusting the dynamics of your tracks is a little trickier than volume and pan. Dynamics refers to the amplitude balance within a single track, not between tracks. For example, your bass guitar should maintain a consistent balance with itself before you attempt to balance it with other tracks in the mix. Dynamic processors, like compressors and expanders, are used to balance the internal volume of any given track.
Adjusting equalization (EQ) refers to volume changes made at specific frequencies, or swaths of frequencies. To perform equalization, you’ll need an equalizer, an electronic tone-control device that provides volume access to your audio signal’s individual frequencies. With an equalizer, you can turn 50 Hz up, say, or turn 2,000 Hz, down or remove all frequencies above 10,000 Hz, or filter out 250 Hz while leaving 350 Hz untouched—all of which will drastically alter the quality and character of your sound. The purpose of all this monkeying about with frequencies is to manipulate and perfect the timbre of each track so that it better coincides with its neighbors. You’ll find through experience that most of the sounds in your mix are far from perfect: Some have too much midrange, some need a treble boost, some have deficient bass, some are noisy, some are boomy, some are sibilant, and some are just awful. In cases like these, an equalizer is your go-to tool.
Applying Effects entails using signal processors like delays, reverbs, and other tone manipulators to enhance the character of your audio. The most common effect—besides EQ and dynamics[2]—is reverb, which is used to simulate ambience. Studio recordings lack ambiance due to close-miking techniques, which entails placing mics in proximity to their sources. If a microphone is close to its source, like it’ll be in the studio, then the sound captured by this mic will be dry, which is audio-engineer speak for “without ambiance.” Many sounds in your mix will need to have ambiance artificially added. In addition to the common effects like reverb and delay, there exists a bewildering panoply of audio effects that are too numerous to list. Not to worry, though—for most audio projects, reverbs and delays are the only effect you really need besides EQ and dynamics
Adjusting these five components—volume, pan, EQ, dynamics, and effects—on all sounds in your mix represents a considerable amount of work, especially if you’ve got a project with a significant number of tracks. As you can probably imagine, this means you’ll be encountering many challenges when trying to construct a mix of commercial quality. Next, we’ll inspect some of the problems that frequently bedevil mix engineers.
Problems
Sadly, there are far more ways to construct a bad mix than a good one. One reason is a phenomenon called accommodation, which occurs when, through continuous, high-amplitude listening, your brain begins to fill in missing sounds with self-generated ones and to ignore existing sounds. You may begin to imagine the bass being more present than it is, or you may be oblivious to an out-of-time cymbal crash. Your epiphany about such deficiencies usually occurs when you listen to your track with a friend and he or she asks, “what’s up with that cymbal, man?” At which point, the true state of your mix comes crashing into your consciousness. The problem of accommodation typically happens when you are hyper-focused on one aspect of your mix instead of the totality of your mix. I’m always equal parts astonished and disturbed when this happens to me—but it does happen, so watch out for it.
Another problem that occurs when mixing is hearing fatigue, which describes your perception of sound being different at the end of a mix session than it was at the beginning. Hearing fatigue will cause you to experience an imperfect awareness of the sounds you’re listening to, and you will begin to make unreliable decisions about volume, pan, dynamics, EQ, and effects. For example, you might turn up a guitar track because it’s not performing well in the mix—at least, it’s not performing well to you and your fatigued sense of hearing. Then, the next day, when you listen back to your mix, you’ll be startled by the deformed, too-loud guitar track. “What the hell was I thinking with that guitar?” you might find yourself asking. Such is the reality of hearing fatigue.
There are three ways to prevent hearing fatigue and accommodation: (1) take frequent breaks, (2) listen in a quiet environment, and (3) avoid overexposure to midrange sounds. Out of these recommendations, taking frequent breaks is probably the most important. Try not to go more than thirty minutes without stopping and taking in about five minutes of silence. Maybe go for a walk and listen to the song play over-and-over in your head, which is what it’ll be doing if you’ve been mixing for any considerable length of time. I sometimes can’t shake earworms for days. Listening in a quiet environment is also key. It’s hard to make sense of audio when you’ve got a furnace running, noisy roommates, or some other din adding to your noise floor. Finally, avoiding overexposure to midrange sounds also helps you avoid accommodation and fatigue. Most musical sounds are polluted with midrange sounds and need to be attenuated in these octaves. Try notching out some of these frequencies with your equalizer. I think you’ll be surprised at how much space subtractive midrange adjustments will make.
Avoiding hearing fatigue and accommodation is only part of the problem, though. To create a good mix, you must configure your sound to work well on many loudspeaker sources. This is done by creating a working mix (a rough draft of the song) and listening to that mix in the car, on a set of headphones, on a smartphone[3], on your grandma’s hi-fi, on a boombox, through a PA system, and on a set of high-end, studio monitors. Not all loudspeaker systems were created equal, so try to configure your mix to perform well on all of them. It’s a tricky assignment, but trial and error should yield results. The key to completing this assignment is making compromises until your mix sounds reasonably good on most playback devices. That’s what the pros do, so that’s what you’ve got to do.
Goals
Creating a good-sounding mix entails the following:
- Maintaining the integrity and coherence of a performance
- Establishing a sound hierarchy
- Placing sounds in a space like a room or a hall to sculpt perspective (Alten 448)
Of these three goals, the most important is the first one. It is imperative that each sound in your mix is clear, direct, and intelligible. Even if your tones and timbres are raucous and rowdy, the raucousness and rowdiness should be clear in the mix. If a listener just wants to home in on your kick-drum part, then he or she should be able to do so. Even sounds at the bottom of your mix hierarchy should be plainly audible. Masking, whereby one sound covers up and renders inaudible other sounds of similar frequency, is the prime suspect in a muddled mix. Proper use of an equalizer can help add clarity. The best strategy is to use subtractive equalization, which entails the removal of frequencies instead of the addition of frequencies[4]. Typically, there are too many sounds in the midrange, so it is wise to attenuate these frequencies from several instruments, especially ones that overlap sonically like the guitar and the piano. You’ll be surprised at how spacious and intelligible your mix becomes once you begin subtracting midrange sounds. Another plan for equalization involves complementary adjustments. For example, the bass drum and the bass guitar exist in the same part of the sound frequency spectrum, so cutting 50 Hz for one and boosting 100 Hz for the other, and vice-versa, will help them both be plainly audible. You might try something similar for the guitar and the piano or the strings and the horns.
Below is a rough guide to the EQ range of common musical sounds like vocals, guitars, drums, etc. It includes the frequency ranges where these sounds reside, and it includes adjectives for describing their desirable and undesirable attributes. To enhance the intelligibility of your mix, try performing subtractive and complimentary EQ adjustments according to these guidelines outlined by Michael Prochak in his book called Cubase SX Official Guide:
- Voice: presence, 5 kHz; sibilance, 7.5-10 kHz; boominess, 200-240 kHz; fullness, 120 Hz
- Electric guitar: fullness, 240 Hz; bite, 2.5 kHz; air/sizzle, 8 kHz
- Bass guitar: bottom, 60-80 Hz; attack, 700 Hz-1kHz; string noise, 2.4 kHz
- Snare drum: fatness, 60-80 Hz; slap, 4 kHz
- Hi-hat and cymbals: sizzle, 7.5-10 kHz; clank, 200 Hz
- Toms: attack, 5 kHz; fullness, 120-240 Hz
- Acoustic guitar: harshness/bite, 2 kHz; boominess, 120-200 kHz; cut, 7-10 kHz (112)
When performing equalization, there are two things to keep in mind: (1) the harmonic content of your track will be altered; hence, it’s timbre will be affected, and (2) almost no one can detect adjustments fewer than 3 decibels; hence, adjustments of 1 to 3 decibels are usually pointless.[1]
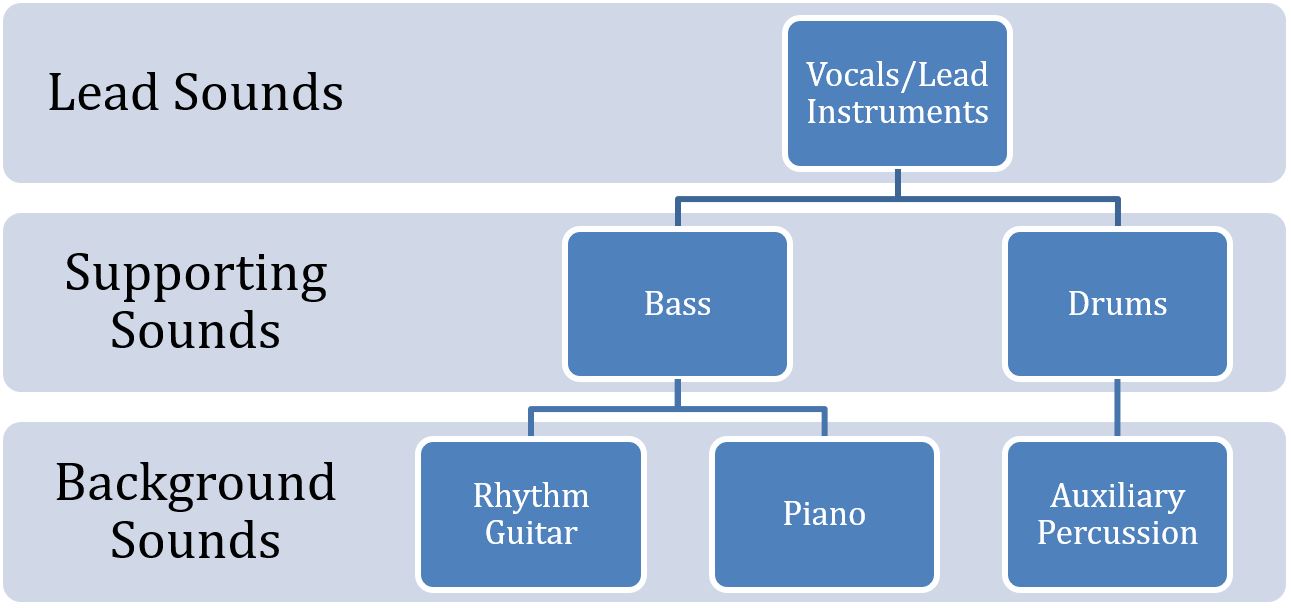
After achieving clarity with an equalizer, your next goal is to construct a hierarchy of sounds by establishing which ones play leading roles and which ones play supporting roles. For example, vocals, lead guitar, piano, and strings typically carry a song’s melody, so they should occupy the top tier of your hierarchy. Bass, drums, rhythm guitar, and piano typically undergird a song’s structure, so they should occupy the lower tiers in your hierarchy. Try establishing a three-tier hierarchy and placing sounds accordingly (see Figure 1). More tiers represent more difficulty and the greater likelihood for incoherency, so I recommend fewer tiers in your hierarchy—two to four is probably all you need. In practice, establishing a hierarchy entails lead sounds not only being louder than everything else, but also panned dead-center in your mix. Your hierarchy also entails lowering the volume of sounds that play supporting roles like drums, bass, rhythm guitar, piano, synth pads, etc. and, in some cases, panning these sounds left or right. Supporting instruments need to form an aural architecture that props up, and highlights, your lead instruments. Such is the nature of a mix hierarchy. Word to the wise: don’t mix with the members of the band present, as they will all cry about not being one-hundred-percent up-front and audible in the mix. Phrases like “know your role” and “serving the song” are useful here.
In most cases, sounds that play leading roles happen sequentially and without overlap. For example, when the vocal phrase is over, the lead guitar should enter the mix at the same level of loudness that was established by the vocals—that is, it should be balanced with the singing but never overlap the singing. If the two sounds—vocals and lead guitar—are ever happening simultaneously, then one or the other needs to be turned down.
Your third goal of mixing is to place your sounds in a space like a room or a hall, which entails manipulating the relationship of space and distance via reverb and panning. Reverb recreates the sound of a performance space by layering multiple, overlapping echo repeats in such a way that simulates a space like a room, theater, or hall. Panning recreates the sound of a band on a stage by distributing its sounds left-to-right between the loudspeakers. For example, you may use reverb to place your ensemble in an imaginary performance hall, and you may use panning to configure your ensemble left-to-right across that hall’s stage. When panning vocals, bass, kick drum, and snare drum, just leave them in the center, or near the center, of your mix. When panning guitars, keyboards, brass instruments, and backing vocals, place them moderately left or moderately right in your mix. Rarely should you pan sounds hard left or hard right. With panning, like everything else about mixing, subtlety is key. As for reverb, a general principle is “less is more.” Be sure to avoid using different reverbs on different tracks like a room setting for one sound and a hall setting for another. Your band should probably be in one room with itself, so just use one reverb and route all your sounds to this one plugin or stand-alone unit. Also, avoid using long decay times or huge room settings because these configurations will saturate your mix with yawning chasms of definition-destroying reverberation. With reverb, as with panning and everything else to do with mixing, subtlety is key.
If you are having trouble getting results with reverb, then Delay is another option for creating space. Like reverb, delay generates repeated instances of the original sound. But unlike reverb, the repeated sound consists of just a few, highly specific occurrences. Reverb, on the other hand, blends many, highly randomized occurrences. Consequently, reverb occupies significantly more space in your mix than does delay. So, if you’re looking for a streamlined approach to ambiance, delay might be your signal processor of choice. You can create perspective with delay by routing your signal to an FX track that’s been treated with a short-timed delay repeat (somewhere around 70 milliseconds) and panning this FX track to the left or to the right. This technique will make your sound lose its focal point in the mix and make it sound like its emanating equally from the left, right, and center—thus, simulating a tight space like a room. In most cases, this sort of delay treatment is cleaner than reverb. There is not a preference for one technique over the other, and neither is “better” than the other. Both are good strategies for simulating a space. The context of your mix may indicate which strategy you choose, and you may even find yourself using both techniques within the context of one mix.
Procedure
Here’s how to go about creating a mix.
First, organize your project by ordering and labeling your tracks. I like to put the drums first, followed by the bass guitar, rhythm guitar, lead guitar, keyboards, synths, lead vocals, and harmony vocals. That works for me, but some other arrangement may work for you. It doesn’t matter, really. If it makes sense to you, then it’s good. But it must make sense. Don’t attempt to mix a chaotic project that’s loaded with mountains of tracks labeled track 1, track 2, track 3, along with tracks that are empty or otherwise superfluous. I can’t emphasize this point enough. Clean your project thoroughly and label your tracks clearly. Be sure to make your bed in the morning, too.
Next, turn all your faders down to zero except for the kick drum, which will be the foundation of your mix. Set your kick’s fader to around -18 to -12 dB and apply signal processing until it sounds like a nice, dull thud that rattles your sternum. Do not pan your kick drum; just keep it in the center. As for signal processors, you’ll probably need to use a gate, a compressor, and an equalizer—in that order—applied as inserts. A general rule for FX is as follows: dynamics and EQ should be applied as inserts; reverbs and delays should be applied as sends. As for the kick drum’s effects chain outline above, you’ll use the gate to isolate the sound, the compressor to stabilize the sound, and the equalizer to enhance the sound. Sit and fiddle with these signal processors until your kick drum is an absolute monster.
Then, perform a similar process with the snare drum, making it a tidy, sharp bark that competes with, and compliments, your kick drum. It should ricochet off your skull as if fired from a Howitzer. Like your kick drum, leave your snare in the center of the mix, and apply compression and equalization to it. However, unlike the kick drum, you should forgo using a gate because drummers often play subtle, nuanced strokes on the snare, and a gate will cut these sounds off. If you need some isolation, then use and expander instead of a gate. For your snare’s compressor and EQ, be sure to use settings that are appropriate for a snare drum—maybe try some presets. Every modern plugin comes equipped with preconfigured settings that are often useful for getting started, especially if you’ve never used signal processors before. In addition to dynamics and EQ, your snare drum should be treated with reverb to supply it with ambiance. For this reverb, route your snare drum to an FX track and apply your reverb there. This way, your snare will still have the clean, unaffected sound and parallel reverberated sound. Your ambiance will be more streamlined and clean this way. Not too much, though. You don’t want a 1980s pop sound… …unless you do. If so, experiment with a gated reverb (Google it).
Next, process your drum overheads and tom-toms. The overheads will need to be filtered under 500 Hz, and the tom-toms will need to be gated. The overhead mics are for high-frequency cymbals, not low-frequency drums; hence, the filter. And the tom-toms should be silent unless they are being played; hence, the gate. Once this is accomplished, pan your tom-toms and overheads left to right corresponding to their locations around the drum set. Be sure to clarify which parts of your kit are on the left and which parts are on the right. Otherwise, you’ll destroy the drum kit’s stereo spread. You might also want to route your tom-toms to the reverb channel you set up for the snare to add some scope and perspective
Then, process the bass guitar with a compressor and some equalization. Be sure to make your bass guitar and your kick drum hold hands with one another and skip merrily across a magical field. It is imperative that they form a powerhouse rhythm that drives your song and encourages dancing. They are “the beat” to use the parlance of our time. If one is masking the other, then employ some complimentary equalization or a special kind of compression called side-chain (Google it.) Keep your bass in the center of the mix and balance its volume so that it’s hyper present but not overwhelming. Also, at this point it is wise to decide whether you can still hear your kick drum. Indeed, from this point forward, inspect your kick’s presence after each addition. If it’s gone, then it’s gone. And if it’s gone, your mix is bad. To be sure, make every sound (except your lead vocal) subservient to your kick drum. After all, it’s what’s driving your song.
Next, process your rhythm guitar, piano, synths—or whatever instrument is providing your harmony—by filtering out some of its low frequencies, so that it doesn’t interfere with your drum-and-bass rhythm, and applying some compression, so that it has a consistent amplitude. Above all, your rhythm instrument should complement your drums and bass. Together, your rhythm guitar, bass guitar, and drum kit should form a unified whole known as the rhythm section. Try panning your rhythm guitar slightly to the left or to the right to provide your mix with some scope and perspective.
Then, process, and mix in, your lead instruments. You may need some equalization and compression, but you’ll surely need some reverb (or delay) for ambiance. Use the same reverb that you set up for the snare. The fastest way to muddy up your mix is to use too many reverbs, so you might as well economize your use of signal processors. Indeed, it’s wise to set up one FX channel for this purpose, apply it with reverb, and route everything you want reverberated to it. There’s no reason to have more than one (or two) reverbs or delays. As I stated above, your band members should probably be in the same room as one another. Once you’ve processed your lead instruments with EQ and effects, pan them in a complimentary manner to your rhythm instruments. For example, if your rhythm guitar is panned right, then pan your lead guitar left.
Next, process, and mix in, your lead vocals. You’ll likely need to apply equalization and compression to achieve a loud, puissant sound that’s designed to cut through your mix with confidence and power. Remember, according to your sound hierarchy, all other sounds are intended to prop up, and highlight, this one sound. Also, keep in mind, that most listeners are non-musicians who are only listening to “the words.” To them, every sound besides the vocals represents an undefined sonic wall collectively known as “the beat.” Remember, it doesn’t matter that you spent two days mixing and EQing your drum overheads—no one cares. Just let the truth of that statement sink into your bones. All anyone cares about is your lead vocal, so take care to process and mix it right. Apply equalization and compression to enhance its character, use the same reverb you’ve been using throughout the project, keep it dead center in the mix, and make sure it’s louder than everything else.
Last, apply some limiting to your master track aiming for about -14 LUFS and bounce (export, render, finalize) your song to a two-track audio file. Upload this song to a platform like Soundcloud, Bandcamp, or YouTube and start promoting your track.
Be sure to perform the above tasks without peaking your meter, to apply equalization and dynamics as inserts, and to apply reverbs and delays and sends.
Conclusion
Mixing is a rigorous endeavor that takes years to master, and this lecture represents but the simplest of overviews. It’s likely that you will create many dull and uninteresting mixes before you create any of commercial quality. Experience is your best guide here. Try recording a whole album of ten songs or more. If you do, you’ll be a better mix engineer on song ten then you were on song one.
Here are a few things to keep in mind when trying to mix a song: first and foremost, the music must be good. A good mix can’t save a poor song that is poorly recorded. However, a bad mix can ruin a well-recorded song. Your duty now is to ruin as many good songs as possible so that you might improve as an audio engineer. Perhaps you should keep your studio fees low until you’ve proven that you can devise a great mix for a great song. Everyone loves free recordings, so you’ve got nothing to lose.
Appendix: Rubric
Below is a rubric designed to measure the clarity and mechanics of you mix. It’s my attempt to impart some objectivity upon an inherently subjective medium.
| Exceptional | Competent | Insufficient | Abysmal | |
| Clarity | Your mix is clear and well-crafted. The listener can effortlessly hear the primary melody. The rhythmic and harmonic components of your mix combine to form an intelligible hierarchy that is plainly announced. | Your mix is clear, for the most part, and the listener can discern the primary melody will little effort. The rhythmic and harmonic components of the mix form a mix hierarchy that is largely discernible. | Your mix is rather obscure, and the listener needs some effort to discern the primary melody. The rhythmic and harmonic components of your mix combine to form a largely abstruse and turgid mix hierarchy. | Your mix is enigmatic and totally indiscernible. The listener cannot focus on the primary melody to any degree. The rhythmic and harmonic components of the mix form no hierarchy whatsoever. |
| Mechanics 1: Editing, FX, and Panning | There are no distracting errors in editing or signal processing. All sounds are properly distributed in the stereo spectrum. | There are few distracting errors in editing and signal processing. For the most part, sounds are distributed appropriately in the stereo spectrum. | Your mix is burdened by some distracting errors in editing and signal processing. Sounds in your stereo spectrum are distributed ambiguously and are occasionally unbalanced or awkward. | There are many distracting errors in editing and signal processing. Sounds in your stereo spectrum display inept distribution or are not distributed at all. |
| Mechanics 2: Equalization and Amplitude | The timbre of your mix is brilliant and clear. The amplitude of your mix is robust and appropriate for the style. | The timbre of your mix is suitable and plain. The amplitude of your mix meets conventional standards and is configured adequately to suit the style. | The timbre of your mix is indefinable and occasionally awkward. The amplitude of your mix is largely insufficient and inappropriate for the needs of the style. | The timbre of your mix is dull or excessively bright and largely awkward. The amplitude of your mix is maladroit and clumsy and wholly improper for the needs of the style. |
Notes
[1] However, you can buy stems, which are the component tracks of a song or audio project. Stems are handy if you do not have access to microphones and musicians.
[2] EQ and dynamics are so ubiquitous that they get their own categories in this list.
[3] Sadly, this is how most people will listen to your song.
[4] Subtractive equalization is attenuation made to certain frequencies so that others may stand out. This technique avoids the problem of cumulative equalization, which occurs when several boosts are made to the same frequency range on several instruments. Cumulative equalization can result in distortion or excessive brightness. Subtractive equalization is the best way to avoid this phenomenon. A common way to get a smooth, polished sound is to use subtractive equalization in a curved shape between 200 Hz and 4 kHz with the notch of the curve centered between 600 Hz and 1 kHz.
[5] However, cumulative effects could result if you make many small adjustments to many sounds.
Works Cited
Alten, Stanley R. Audio in Media 9th ed. Wadsworth, Cengage Learning: U.S.A. 2011. Print.
Prochak, Michael. Cubase SX Official Guide. Sanctuary Publishing Limited: London. 2002. Print.

Leave a comment