
Equalizers, Reverbs, and Dynamics
Introduction
Signal processors are devices that alter and enhance audio. They exist in both the analog and digital realms—that is, they exist as devices within analog signal chains, and they exist as plugins within DAWs like Pro Tools, Cubase, and Studio One.
This blog post covers the following types of signal processing: equalization, reverberation, and dynamics. It focuses on the plugin variety instead of the analog variety because most of your experience with these devices will be in the digital realm, not the analog realm.
We’ll begin our exploration of signal processing with the equalizer.
Equalizer
The most common signal processor is the equalizer, which is an electronic tone control device that alters sound by increasing or decreasing volume at specific frequencies. Equalizers are sometimes called spectrum processors because they process sound across the sound-frequency spectrum, which is the region of sound that extends from 20 Hz to 20,000 Hz and corresponds to the range of human hearing. You can think of an equalizer as a volume control device designed to affect specific frequencies.
There are three kinds of equalizer: (1) fixed frequency, (2) parametric, and (3) graphic.
Fixed-frequency equalizers are the least powerful of the three. They are commonly found on car radios, guitar amps, and cheap mixing boards. You’ll know you’re dealing with a fixed-frequency equalizer if you see three knobs labeled bass, mid, and treble—or low, mid, and high. Although they are useful in some contexts, fixed-frequency equalizers are not especially useful to music technologists and audio engineers. They are blunt tools, not precision instruments.

Fixed-frequency EQs are nice to have on your car stereo, and they are marginally useful on guitar amps, but that’s where their utility ends. The problem with these devices is that they are not adjustable for specific frequencies, hence the name.
Another problem is that the fixed-frequency equalizer’s low, mid, and high knobs affect a large swath of frequencies, not just the frequency they’re centered on. For example, if you adjust the mid knob on one of these devices—which is usually set on or around 1,000 Hz—then frequencies down to about 320 Hz and up to about 2000 Hz will also be affected. The swath of also-affected frequencies on fixed-frequency equalizers forms a fixed and immutable bell-shaped curve (Figure 2). The width of this curve, which is a measurement called Q, is not changeable with fixed-frequency equalizers.
Professional audio technicians need to be able to change both the selected frequency and the width of the Q when applying equalization. Therefore, fixed-frequency equalizers are effectively useless in a pro-audio context. The most useful type of equalizer to professionals is the parametric equalizer, which I’ll cover next.
The parametric equalizer is an improvement on the fixed-frequency variety for several reasons. Superficially, a parametric equalizer resembles a fixed-frequency equalizer in that it often has knobs labeled low, mid, and high, or high, mid, and low. But, unlike the fixed-frequency equalizer, the parametric equalizer also has a control knob (or knobs) for selecting specific frequencies, and most also have a control knob (or knobs) for adjusting the Q width.
Because of these extra knobs, the parametric equalizer allows audio engineers to select any frequency in the sound frequency spectrum for adjustment and to manipulate the width of also-affected frequencies.

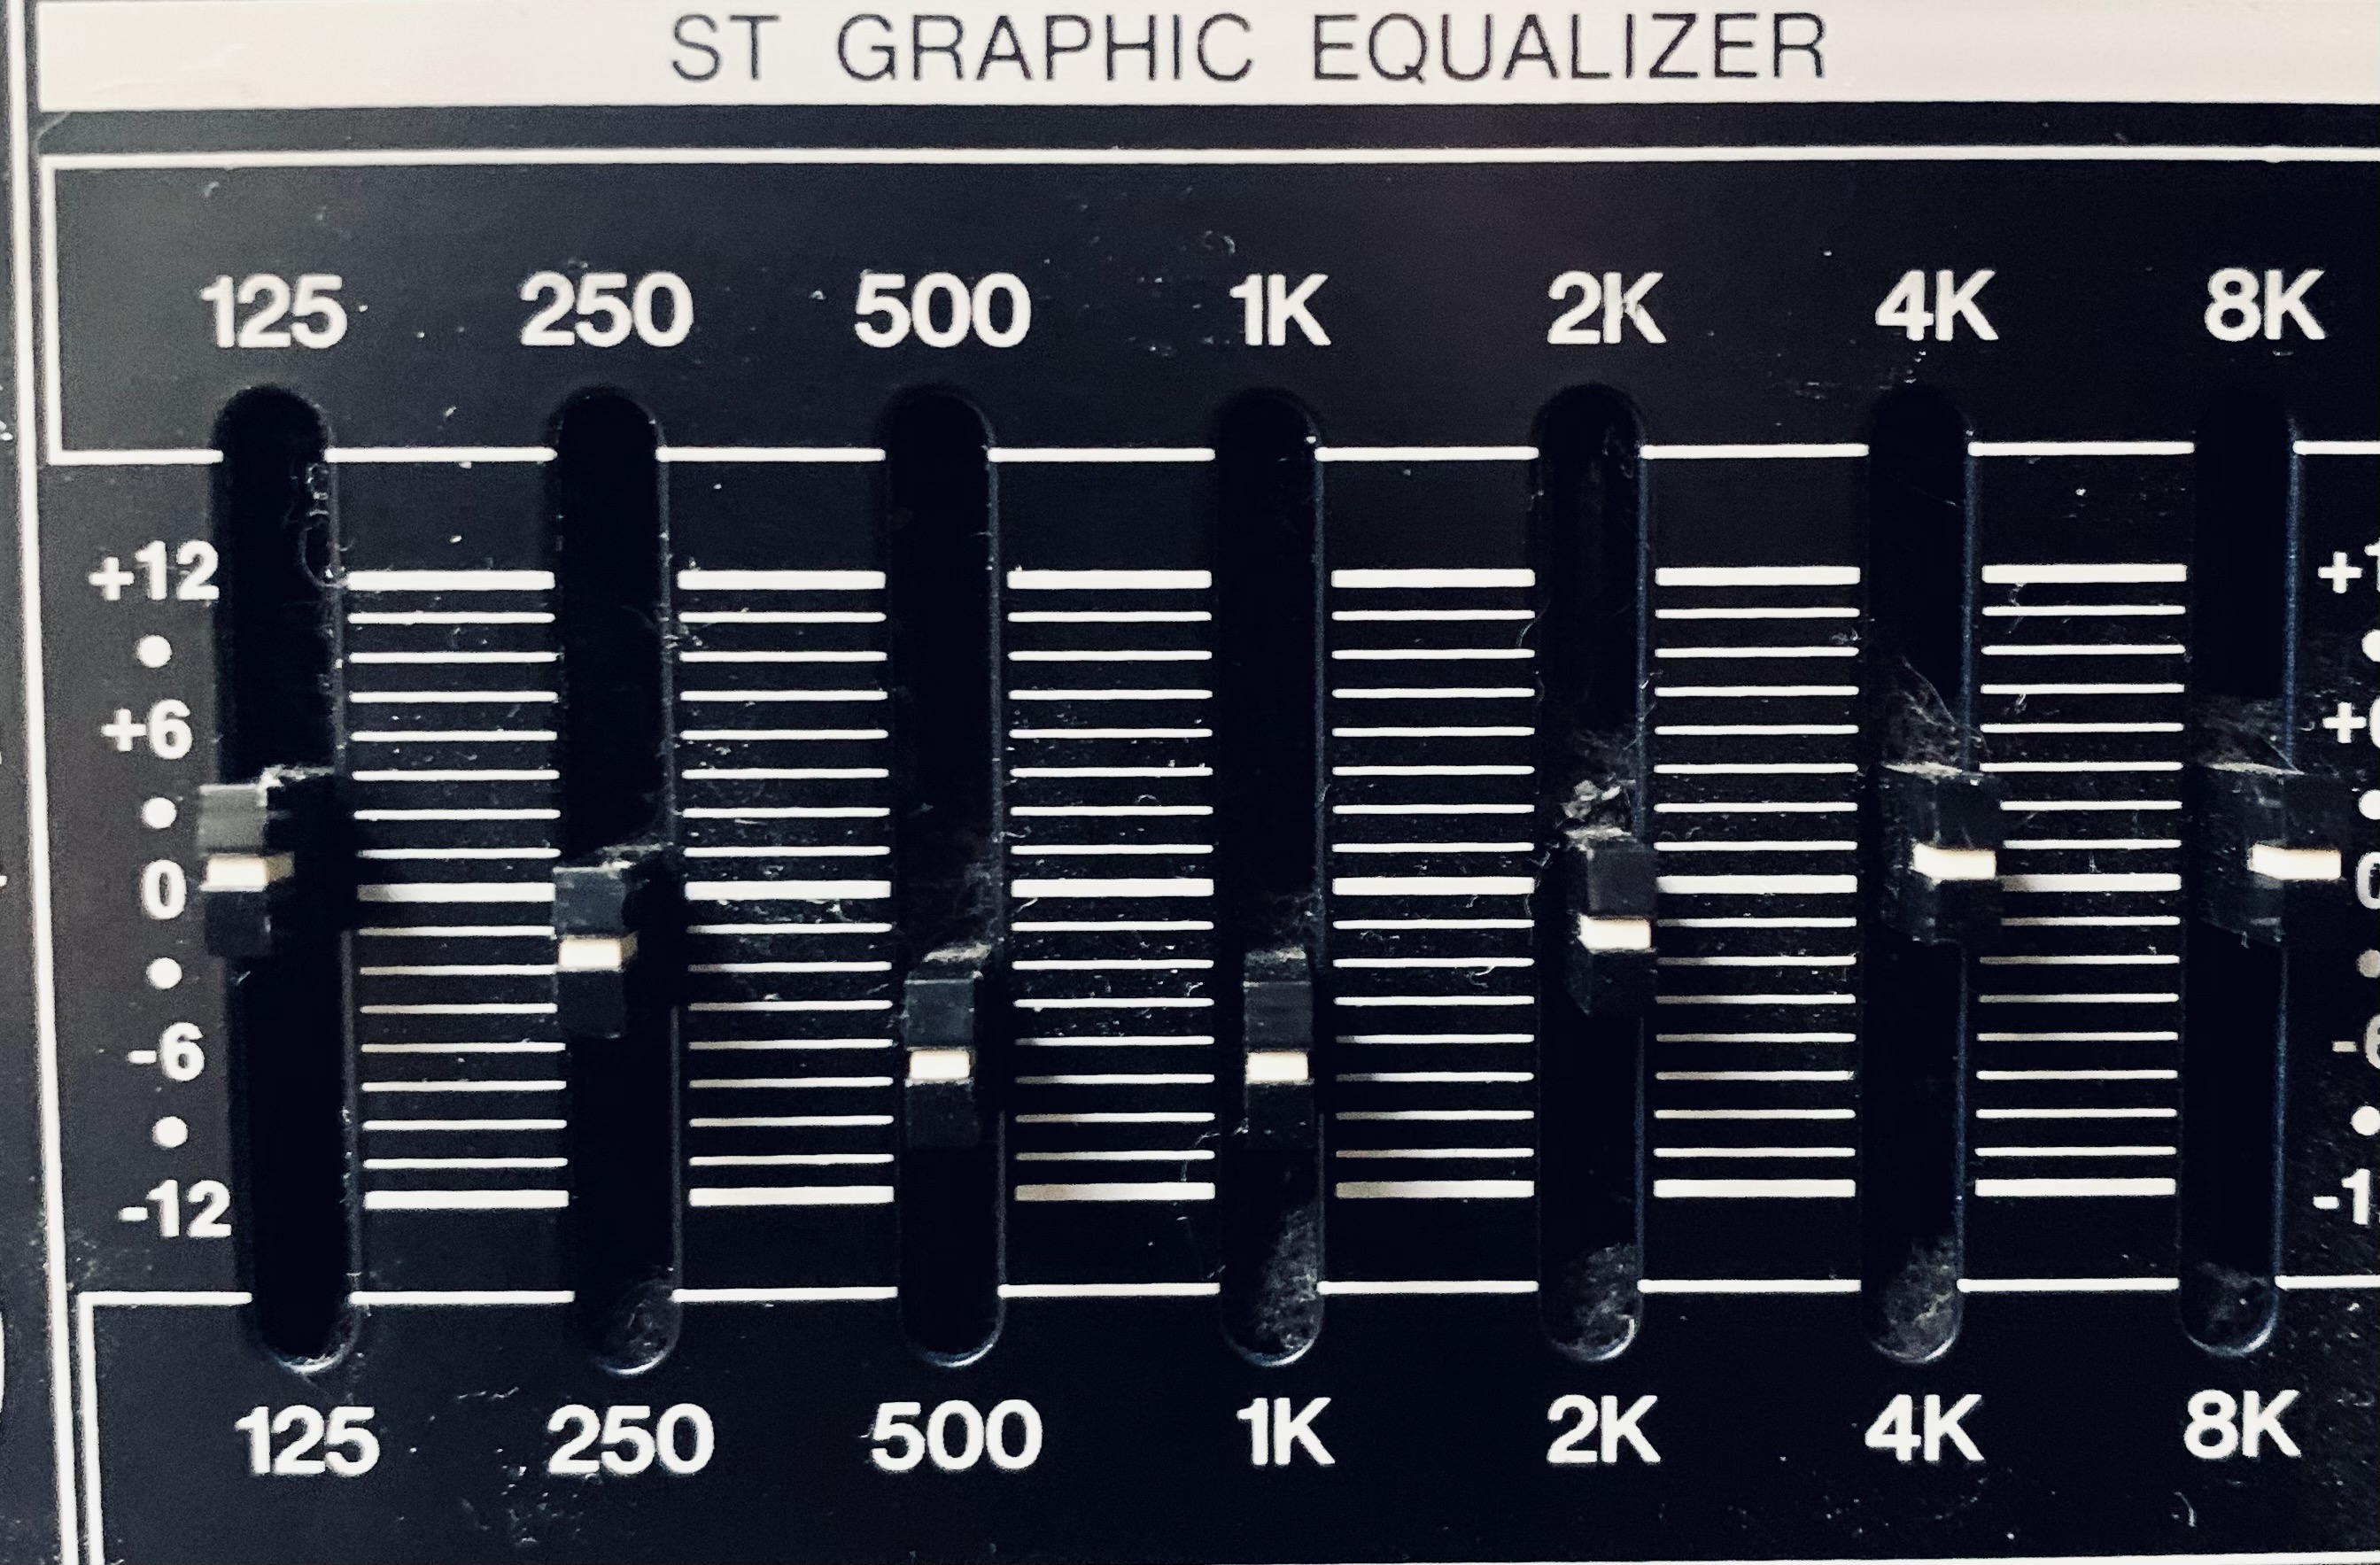
The equalizers found on professional-grade mixing consoles and DAWs are either parametric equalizers or graphic equalizers. Graphic equalizers have sliding control faders instead of rotating knobs, but they are essentially the same as parametric equalizers. (Indeed, some professional equalizers feature both mechanisms of adjustment.) Graphic equalizers are usually adorned with eight to sixteen faders for adjusting frequency and Q width. They allow users to visually sculpt Q and amplitude levels. For example, with both the graphic and parametric equalizer, you can boost 250 Hz but not affect 500Hz, or you can cut 1,000 Hz but not affect 900 Hz, etc. Adjustments of this sort are not possible with a fixed-frequency equalizer
The Pro EQ plugin within Studio One features both a graphic and a parametric interface:

Now that we know the different varieties of equalizer, let’s inspect how to use them properly. There are three ways to perform equalization with parametric and graphic equalizers: (1) notching, (2) shelving, and (3) filtering.
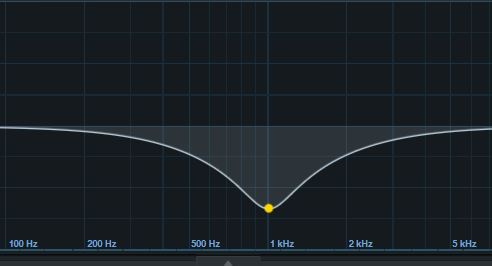
Notching is done by establishing a center frequency and boosting or cutting its amplitude (volume). When you do this, the selected frequency is the most affected, and the neighboring frequencies are affected to a lesser extent.

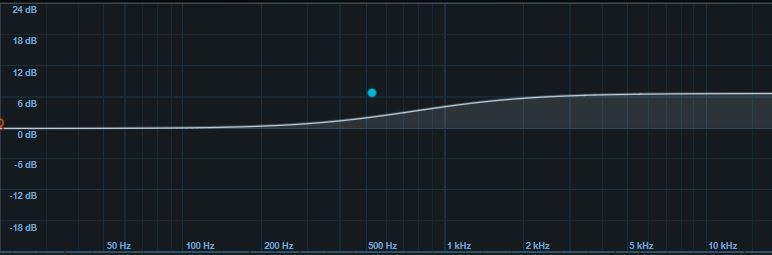
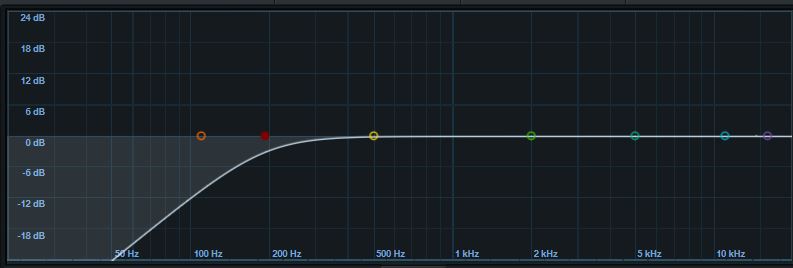
With shelving, all frequencies at or below a selected frequency are increased or decreased by the same amount. The resulting EQ curve looks like a flat, tabletop or like a shelf, hence the name. If your desire is to increase all frequencies above 1,000 Hz, say, then applying a shelf is the appropriate tactic.
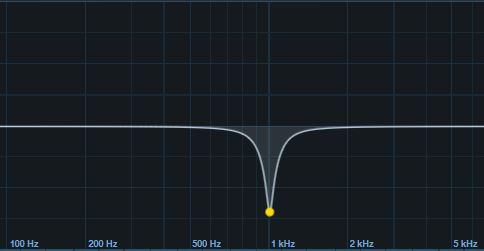
Filtering entails eliminating a certain frequency or swath of frequencies. Filters superficially resemble notches and are sometimes called notch filters. The difference being that filters turn a selected frequency completely off instead of just turning it down. Also, notches can be used for boosting frequencies, whereas filters always cut frequencies.

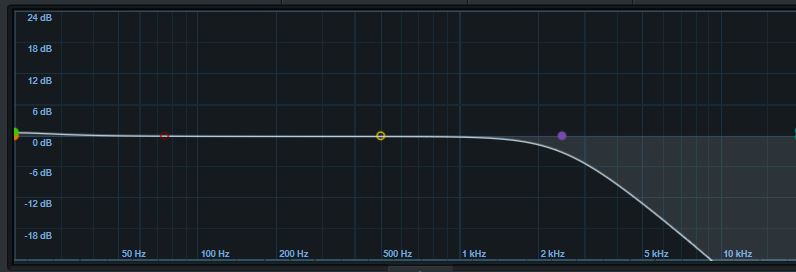
High and low pass filters attenuate all frequencies above or below a selected point. Low-pass filters allow bass frequencies to pass but attenuate high frequencies. High- pass filters do the opposite. The alternative names high cut and low cut are sometimes used instead of low-pass filter and high-pass filter.
Band-pass filters allow you to select high and low frequencies for filtering. The result of this type of equalization is a sound that seems to emanate from a tiny, transistor-radio style speaker.

Notch filtering and band pass filtering are sometimes used for corrective endeavors instead of creative ones. If proper microphone technique is used, then filtering is usually not necessary. Next, we’ll consider the signal processor responsible for simulating the ambient character of halls, rooms, and theaters—reverb.
Reverb
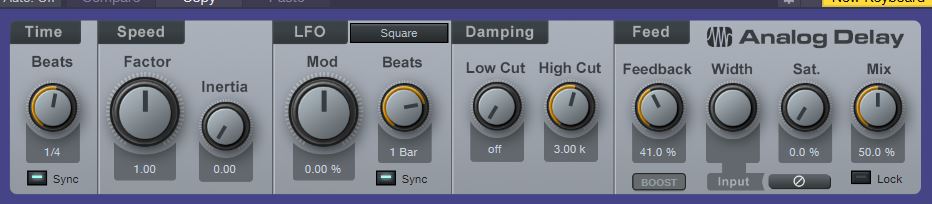
Reverb is a signal processor that simulates the ambient sound produced in a performance venue or space. Common rooms that are simulated by reverbs include halls, cathedrals, theaters, and just about any space imaginable—including tunnels, canyons, wells, and so on. The fundamental signal processor at the heart of modern reverb units is called delay. Delay is the electronic process of copying an audio signal and playing it back later.
Delay units create echoes in which the repeated sounds are clear and distinct from the primary sound. To hear delay in your mind’s ear, imagine yelling an abrupt, sharp, and loud syllable into a canyon. Hear that echoey bounce in your mind’s ear? That’s delay. Reverb, in contrast, is an effect in which the primary sound, and its echoes, are blended into one, hybrid all-encompassing ambient sound. Imagine your same barked syllable inside a cathedral—that’s reverb.
In nature, reverb occurs when a sound hits a surface, echoes back to the listener, and combines with the primary sound. Sound reflects off surfaces in this way until it loses all its energy. In some listening spaces, this may take several cycles of bouncing and reflecting chaotically before it finally dies away. Natural reverb erodes gradually as its reflections lose energy, usually over a period of seconds.
Reverb is created electronically by adding multiple, randomized delay repeats to the original sound. Vocals, instruments, and other musical sounds often benefit from the application of a modest amount of reverb. The recording studio captures a clean and dry character of audio that sounds dull and unnatural. To make the sound more lifelike—like that experienced in a performance venue—reverb is applied to the audio signal.

Following are some common adjustable elements found on reverb units:
- Pre-delay is the amount of time that transpires between the primary sound and the sound of the first reflections. Setting the pre-delay high will keep the reverb reflections out of the way of the original sound in such a way that helps improve clarity.
- Initial reflections are the early echo repeats that are audible before the reflected sounds blends with the primary sound to become reverb. Not all reverb units can adjust initial reflections.
- Room size combines a few other parameters to simulate a specific room dimension. When adjusting room size, the sounds will be layered to mimic a room, hall, or acoustic chamber.
- Reverb time or decay measures the time it takes for the reflections to drop below 60 dB and become inaudible. Setting short reverb times can help improve the clarity of a mix. On the Mixverb plugin, this parameter is called “Damp.”
There are four kinds of reverb: (1) plate, (2) digital, (3) spring, and (4) acoustic chamber.
Plate reverb is a mechanical device featuring a thin steel plate suspended under tension and affixed with a transducer. The transducer brings about vibrations in the plate that are recaptured by a contact microphone. Plate reverbs are large, heavy, and not practical, but they sound cool. They are especially good on background vocals.

Acoustic chamber reverbs are created by playing audio via loudspeaker into a large room, recording the sound of the room with a microphone positioned far from the speaker, and then blending the recorded sound with the original sound.
Spring reverbs are only used on guitar amps because they sound poor for every other application on Earth. The operating principle of spring reverb is like plate reverb. For spring units, the audio signal is routed through a large metallic spring affixed inside a box. The spring vibrates sympathetically with the audio, and these spring reverberations are added back the original signal.
Digital reverbs can imitate all the characteristics of plate, spring, and acoustic chamber reverbs. The reverbs that exist within the plugin format are all digital reverbs, even if they claim to be “analog” reverb. In these cases, the analog character is being simulated digitally. Nothing inside a computer is analog except for the on-and-off flow of electricity that accounts for the 1s and 0s of binary code.
Next, we’ll cover dynamic processors. But, before we do, let’s answer the following review questions:
Dynamics
Dynamic processors deal with the amplitude of sound. Common dynamic processors include:
- Compressors
- Limiters
- Expanders
- Gates
Compressors and limiters are the same devices, differing only in the degree to which they affect sound. Compressors are less severe than limiters, so their effect on sound is less severe. A compressor (or a limiter) is used to control excessive volume by restricting the signal’s output amplitude. If a recorded signal is steady around 30 dB, say, but at one point the track jumps up to 70 dB, then any uncompressed mixing of this track will be beholden to that 70-dB transient. Compressors and limiters can be used to fix these sorts of amplitudinal problems.
A compressor/limiter decreases the differences between loud and soft sounds. To perform this trick, these devices use four controls: ratio, threshold, attack, and release.
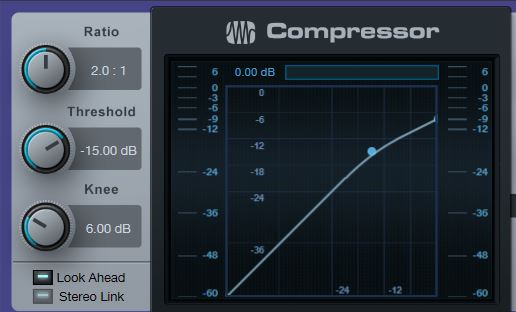
The ratio control establishes the degree of compression. For example, a compression ratio of 2:1 means that for every 2 dB increase in signal level the output level will only be granted 1 dB of increase. Therefore, if you set the compressor’s ratio to 5:1, then, for every 5 dB increase attempted by the sound, the compressor only allows 1 dB of increase. (A limiter, by the way, is a compressor set with its ratio set at 10:1 or higher.)
The Threshold setting on a compressor/limiter adjusts the amplitude at which the compressor begins working. Informed threshold settings can be made by watching the amplitude display on the channel strip and setting the threshold accordingly. The best practice is to set the threshold near the sound’s peak for light compression, near the sound’s RMS for medium compression, and deep within the sound’s waveform for strong compression.
The Attack control determines how long it takes for the compressor to activate upon encountering the sound’s threshold amplitude. Fast attack is good for drums, and slow attack is good for piano.
Release time is how long it takes for your compressed/ limited signal to return to its uncompressed parameters after the signal has sunk below the threshold. If the release is set too long, then the compressor may begin making breathing-like sounds as it attempts to turn silence into loudness.
Here’s a sample compressor setting for a kick drum: Ratio (7:1); Threshold (-17 dB); Knee (.10 dB); Attack (40 ms); Release (50 ms).

The ratio and knee settings are set high to control the kick’s highest levels. Try a ratio setting of 7:1. The attack setting should be set fast, but it shouldn’t be set so fast that the sound’s punch is lost. A good method for adjusting the attack setting is to start at 0 and stop when you can hear the beginning of the sound clearly. Do not go further. The release setting, which determines how long the compressor stays on, can be set fast when used on kick and snare drums.
A compressor shapes a soundwave’s attack and sustain. Slowing the attack time will soften a sound’s impact and raising the ratio will increase sustain. Lowering the threshold setting will decrease the difference between the transient and decay portion of a soundwave.
For snare, use a lower compression ratio, perhaps 3:1 or 2:1, to de-emphasize leakage. Since the snare is closer to the other sounds of the kit, these other sounds will end up on the snare mic. The kick drum, by contrast, is more isolated.
Here are some common uses for compressor/limiters:
- Compressors can be used to minimize the wide differences in loudness caused by musicians not maintaining a consistent distance from a microphone.
- Compression smooths the attack out of guitars, basses, drums, and horns as well as Foley sounds like jangling keys or applause.
- Compression can improve the clarity of speech.
- Compression used on vocals brings them forward in the mix.
- A limiter prevents a loud sound from saturating a recording.
The combination of compression and limiting can add power and loudness to a sound.
The expander is another signal processor in the dynamic category. Expanders and gates, like compressors and limiters, are the same devices as one another—differing only in degree to which they affect the sound. Instead of reducing the difference between loud and soft sounds like a compressor, an expander increases the difference between loud and soft sounds.
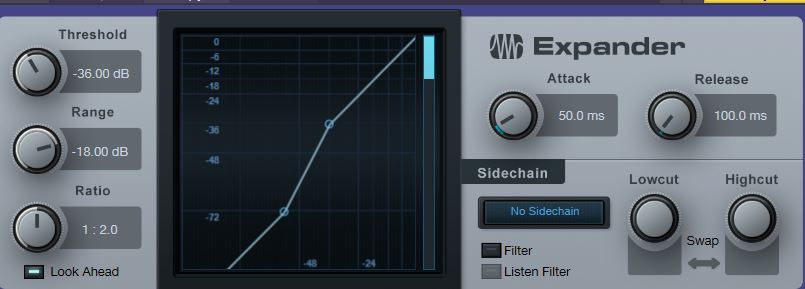
When a signal falls below a certain threshold, the expander is triggered, and low-level sounds are turned down while high-level sounds are maintained. The expander/gate is the opposite of a compressor/limiter. A gate, or noise gate, is often used as a repair tool. Below a certain threshold, a noise gate turns the sound completely off, whereas an expander only turns the sound down. This effect can reduce or eliminate unwanted sounds like amplifier hum, microphone hiss, or other residual sounds captured by the microphone.

Conclusion
Equalizers, reverbs, and dynamics are the most common signal processors. As you can probably imagine, there are many more effects, but they are not nearly as common as EQ, reverb, and dynamics. Like reverb, the signal processor called delay is the progenitor of these other effects. Indeed, chorus, flange, and phase are all delay-based effects and will be covered in detail in my class called Audio Recording.
For now, the use of EQ, reverb, and dynamics will allow you to greatly enhance the character and quality of your audio. By using these three simple effects, you’ll be able to create songs, podcasts, and sound designs that approach commercial quality.

Leave a comment