
Introduction
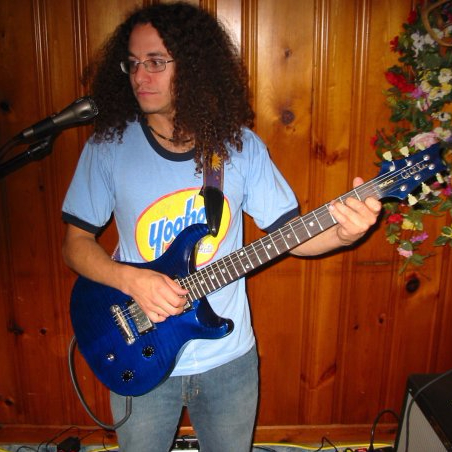
When I was in my mid-twenties, I played in a jam band called Grand Vision Channel.
After several months of rehearsing and performing, the group and I decided to record an album. As the resident technology expert in the band, I was tasked with making this happen.
In the end, the album had eleven songs—perhaps forty minutes of music. Despite this brevity, the project managed to take me over a year to complete. Getting good takes and mixing occupied about twenty percent of that time. The rest was spent editing.
My experience of fixing the mistakes on this album was like pulling weeds from a garden: every time I’d eliminate one, I’d notice two more.
Through the course of editing any given song, I’d observe things like the following: the intro guitar came in wrong, the vocals during the verse were slightly out of tune, the snare fill during the bridge was off beat, the bass guitar peaked during the second chorus, the outro guitar solo had phase issues, the keyboard part didn’t match up with the rhythm, the harmonies were wrong, and many other deformities and imperfections that bedeviled the entire project.
Nevertheless, I tackled these editing problems with a kind of maniacal devotion that bordered on stupidity. In retrospect, I feel that I should have returned to the basic tracking stage of the project and just got better takes. After all, sometimes it’s just best to go back to the drawing board.
I didn’t do this.
Instead, I devoted my energies to editing every jot and tittle of those eleven songs. It was the one thing I could control. My recalcitrant band members, on the other hand, I could not control. “It’s fine, dude,” they said. “Just mix it and let’s be done with it.”
I did not take their advice. Rather, I manifested the spirit of the 2001 hit song, “Rockin’ the Suburbs,” by Ben Folds wherein he sings, “Take the checks and face the facts that some producer with computers fixes all my shitty tracks.”
I had eleven, shitty tracks to fix. In the process, I learned how to edit. This blog post is a summary of my knowledge in this department. In it, I’ll explain the basic concepts of editing and how to perform simple edits using Studio One, which is my current DAW.
Definition
Editing audio entails altering recorded sounds to eliminate mistakes, improve clarity, and more perfectly realize an artist’s goal.
To do this, some sounds will need to be deleted, some will need to be moved, some will need to be pitch-shifted, some will need to be spliced with other sounds, some will need to be time-stretched, some will need to be faded in, some will need to be faded out, and some will need to be crossfaded.
The point of all these adjustments is to make sure that the listener is not distracted from the content of the song by the quality of the audio. If the audio lacks coherence or is riddled with error, then the listener is going to listen to something else.
To ensure that the listener is not distracted by the audio quality, editing must continue until the sound has reached commercial quality.
To do this, engineers must be fluent with these two things: (1) the basic concepts of editing and (2) the editing capabilities of their DAW.
The Basic Concepts of Editing
Editing audio with a DAW is quite like editing text with a word processor. Like a text editor, a sound editor allows you to cut, paste, copy, delete, and insert. Unlike a word processor, however, a DAW also allows you to augment and diminish the temporal nature of the content—that is, it allows you to stretch and modify the sound like clay.

The act of editing should be distinct in your mind from the act of mixing, which is the art of balancing amplitudinal levels and spatial positioning.
Editing, on the other hand, is comprised of temporal and qualitative considerations. Which is to say, editing is comprised of rearranging and altering sounds so that they unfurl in a perfected way. Editing should proceed along a logical course of action:
- Identify each sound in the mix through analytical listening
- Relate each of these sounds to the overall goal of the track
- Eliminate any sounds that obscure this goal
- Clarify the details of every sound so that they more perfectly collaborate with the other sounds in the mix
- Re-record any sound that is not maintaining a standard of excellence
Once these decisions are made, you can move on to the nuts and bolts of editing. Perhaps the most important consideration is precisely where along a sound’s envelope to apply a splice. There are three points on a sonogram that best admit to seamless edits:
- Moments of silence
- Just before transients
- Zero crossings

Transients are moments of intense amplitude born of a sound wave’s initial impact. They are represented on a sonogram by a spike in the sound wave.
Zero crossings refer to the moment when a sound wave is perfectly between compression and rarefaction—that is, the microsecond of silence that occurs while the sound wave is transitioning from above the line to below the line (or vice versa).
When editing at transients or at zero crossings, clicks and pops may be audible. If this is the case, then a crossfade may be used to silence the unwanted sound. A crossfade occurs when one sound is turned down while another sound is simultaneously turned up.

As a rule, it’s best not to splice the middle of a sound’s envelope. Edits of this sort tend to be audible. Usually, no amount of crossfading can fix center-envelope edits because the sustain portion of the sound envelope has been interrupted in a way that is impossible to mask.
Edits made to rhythm tracks are best applied at the downbeat, which is the moment of time situated at the beginning of a musical bar. Having recorded a song to a click track will greatly improve editorial access to this part of the rhythm.

Also, it is imperative that a song’s beat is not obscured by careless editing. If there’s a hiccup in the music because of an edit, then the edit will have to be repaired. Even non-musicians can detect a contorted rhythm.
Another consideration of editing is the maintenance of ambience, which is the room tone. If you are splicing together sounds that were recorded in disparate environments, then the sudden change in perspective brought about by splicing these sounds together might be audible. If the source material was captured in different rooms with different microphones, then the two sounds will likely have different timbres.
One of the most common editing techniques is called compositing, which is the act of assembling various audio parts into a larger whole. Vocal tracks are often constructed through compositing to ensure perfection. I’d venture a guess that almost no lead vocal part that you’ve heard in modern pop music is comprised of a single take. Compositing is largely responsible for the polish of modern pop records.
The concepts of pitch shifting and time stretching are covered below along with the editing capabilities of Studio One.
The Editing Capabilities of Studio One
The smallest fragment of audio in Studio One that admits to editing is called an Event. An Event is a single clip of audio. They are indicated by a rectangular box that contains a graphic representation (sonogram) of the sound wave.

To best interact with these audio Events, it is wise to have Snap enabled—especially if the song was recorded to a click track. Snap ensures that all your edits and clicks adhere strictly to the time grid.

Press the letter N to activate Snap. To temporarily override snap and move about freely, hold down the shift key while dragging an event.
To duplicate an event, select the event in question and press the letter D. This makes an independent file, so any adjustment made to the duplicate will be reflected on that duplicate only. If, instead, you press Shift + D, then the duplicates will be clones of one another, and all edits will be universal.
To duplicate something and insert it into the project so that it pushes other Events to a later point in the song, press Alt + D.
Editor View is helpful if you want to stay zoomed in on one part of an Event as you work on its edits. You can access Editor View by double-clicking on an event.
The Arrow Tool, which allows you to move an Event, resize an Event, or time stretch an Event, is the standard tool for editing.

To move an event, click on the event in question and drag it to the left or to the right. This will perform a temporal edit, which means it will perform a shift in that event’s location along the timeline. It is also possible to reposition the event onto a new track if you drag up or down.
To resize an event, click on the front or back edge of the event in question and drag to the right or to the left. When you do this, the arrow will turn into the Resize tool, which looks like a vertical line with an adjacent arrowhead.
If you need a sound to happen faster or slower, then use the time stretch tool. To time stretch an event, hold down the Alt key and click on the right edge of the event in question. This will alter the amount of time it takes for any sound to unfurl.
Studio One also allows users to pitch shift audio Events. To do so, right click on the Event, and change the value for the dialogue labeled Transpose or the dialogue labeled Tune. Transpose allows you to change the pitch content by half step, and Tune allows you to change the pitch content by cents. A half step is the smallest interval found in Western music, and a cent is one hundredth of a half step.

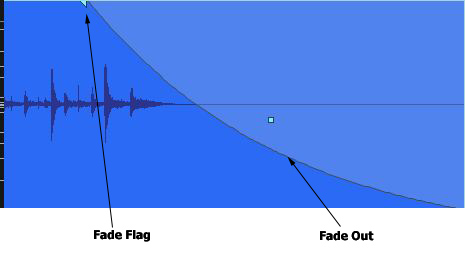
To fade an Event, click and drag on one of the Fade Flags. The shape of the fade can then be altered using the Fade Curve box.
The volume of an event can be altered by clicking and dragging up or down on the Volume box, which is located at the top of all Events.

The Range Tool allows users to highlight entire sections and multiple events for group editing. To eliminate a section of Events, highlight this section with the Range tool and press Delete. You can also move an entire section or multiple events with the Range tool by highlighting and dragging. This maneuver will move the selected material but keep the individual parts of that material fixed and relative to each other.

The Split Tool splices an Event into two Events. If Snap is enabled, then all splices will adhere to the time grid.

The Bend Tool is used to adjust an audio Event’s timing by placing or moving Bend Markers, which can be automatically placed before transients. The Event can then be split at these markers, and the resulting sub-Events may be moved about manually or by quantization. To imagine the utility of this tool, think about an out-of-time drum set part. Now imagine being able to cut the part into pieces and then being able to force those pieces into perfect time. The Bend tool allows editors to wield powers that border on dark magic. (See the Ben Folds quote above.)
To operate this magic wand, do the following: first, double click on an Event with the Bend Tool activated; then, click analyze; next, set the threshold to the desired sensitivity; last, apply quantization.

The Event will first be cut into pieces and then forced into perfect time.
A crossfade is a combinatory affair that fades one sound in as another sound is faded out. To create a crossfade, select two neighboring Events and press the letter X. This will perform a fade-in and a complimentary fade-out.
Constructing a composite track is best done by using layers on a single track. If the takes were recorded to separate tracks, then start a new track and drag all takes onto it by clicking the Track menu, then the Layers sub menu, and then the Add Layers double-sub menu.
Expand the layers so that you can see all the takes, and use the Listen Tool to check out each take. Click and hold the speaker icon before any given phrase, and Studio One will play that figure without needing to mute the other layers—they’ll be automatically muted. Last, use the Arrow tool to highlight the desired figure, and it will be composited onto the active, top layer.

Conclusion
No project is uncontaminated by the editing process. Unless you are recording the audio ejaculations of an artificially-intelligent super brain, you will almost certainly have to employ some of the tactics outlined above.
Remember, if you find yourself unpacking the universe, or reinventing the wheel, then perhaps it’s time to return to basic tracking.
However, if you can’t return to basic tracking, then a steadfast dedication to editing will help you salvage and repair what you’ve got to work with.
Indeed, despite their flaws, and despite the fact that I had to both unpack the universe and reinvent the wheel, I quite like the Grand Vision Channel recordings. After all, they taught me how to edit.

Leave a comment